Once on a crispy mountain morning, I headed out to ski with excitement. But then, I had to cram my feet into the ski boots. That turned my ski trip dream into a day of discomfort. I realized things does not have to be this way for us skiers. So, after chatting with the experts on the resort, I found the the culprits. There are some tips which anyone can use to make their ski experience more fruitful. From my own experience, I know how important it is to have well-fitted ski boots that provide support and cushioning. I’m going to share some of the tips and tricks I’ve learned over the years to make my boots as comfortable as possible. We’ll look into the secrets of proper fit, essential gear, and hacks to ensure all-day comfort on the slopes.
4 Tips on how to make your ski boots more comfortable.
1. Get fitted properly:
Achieving a perfect ski boot fit relies on a data-driven approach. Start by measuring your feet in both length and width, considering your sock thickness. With this information, a boot fitter can recommend boots with a matching last (interior mold shape).
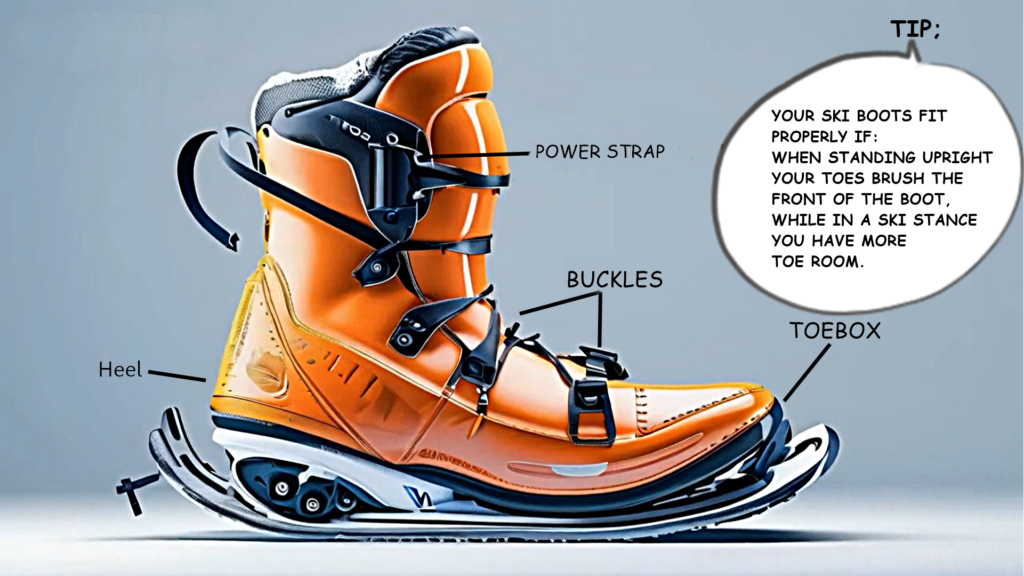
The shell fit is crucial: there should be a finger width of space in the heel with the liner removed, ensuring proper heel hold when the liner is inserted. Your toes should just brush the front of the boot when flexed forward, with no pinching on the sides.
This balance between snugness and wiggle room is key for optimal control, warmth, and circulation throughout the ski day.

Selecting ski boots involves a two-pronged approach: finding the right size and ensuring a proper fit. Here’s a breakdown of both:
Finding Your Size:
- Mondopoint: Ski boots are sized in Mondopoint, a system based on foot length in centimeters. Measure your foot length while wearing the socks you’ll ski in. Stand with your heel against a wall, trace your foot on paper, and measure the longest toe distance to the wall.
- Sizing Charts: Use a sizing chart (available online or at ski shops) to convert your foot length to a Mondopoint size. These charts are a starting point, but consider your ability level as well:
- Beginners: Choose a boot close to your measured size for maximum comfort and warmth.
- Intermediate/Advanced: You might opt for a boot a half size smaller for a more precise fit and better control.
- Expert: Very stiff boots a full size smaller are common for the most responsive feel, but require a skilled boot-fitter to ensure comfort.
Boot Fitting:
A proper fitting is crucial for comfort and performance. Here’s what to expect:
- Shell Fit: The boot fitter will assess the shell size (plastic outer boot) with the liner removed. There should be about a finger width of space in the heel for proper hold when the liner is inserted.
- Liner Fit: The liner should snugly wrap your foot without pinching. Toes should just touch the front of the boot when flexed forward.
- Flex: Flex refers to the stiffness of the boot, impacting control and responsiveness. Beginners benefit from a softer flex for easier maneuverability, while advanced skiers prefer a stiffer flex for precision.
Additional Tips:
- Bootfitter Expertise: A skilled bootfitter can make adjustments like heat molding the liner or grinding pressure points for a customized fit.
- Don’t prioritize size: Focus on achieving a snug, comfortable fit that allows for good circulation. Don’t just buy based on the Mondopoint number.
- Bring your ski socks: Wear the socks you’ll be skiing in during the fitting process.
Remember, a good ski boot fitting is an investment. It ensures comfort, performance, and prevents blisters and foot pain, allowing you to fully enjoy your time on the slopes!
2. Invest in good socks:
Ski socks are specifically designed to wick away moisture and keep your feet warm and dry. They should be thin and fit snugly.
Here’s how to select and wear ski socks for ultimate comfort in your boots:
Selection:
- Thickness: It’s a balancing act. Thicker socks provide more cushioning but can restrict blood flow and feel bulky. Opt for midweight socks for most skiers, offering warmth and some padding without sacrificing feel. Thin socks are ideal for racers or skiers with well-fitting boots, maximizing control.
- Material: Merino wool is a top choice. It wicks away moisture, fights odor, and insulates even when damp. Synthetic blends offer similar benefits with added durability. Avoid cotton, which absorbs moisture and can make your feet cold.
- Fit: Snug is the keyword. A loose sock will bunch and cause blisters. The heel should hug your foot, and the entire sock should stay put during movement. However, avoid constriction that cuts off circulation. Look for socks with targeted compression for extra support.
Wearing:
- Don’t double up: One pair of well-fitting ski socks is all you need. Layering socks disrupts boot fit and can lead to blisters.
- Trim toenails: Long nails can snag on the sock and cause irritation.
- Wear them inside out for the first use: This helps break them in and reduces initial stiffness.
By following these tips, you’ll have happy feet that are warm, dry, and comfortable all day on the slopes!
3. Putting your boots on:
Here’s how to buckle your ski boots strategically for optimal comfort, control, and performance:
Buckle them strategically: Start at the top and work your way down, snug but not too tight. Focus on heel fit for good control.
The Order:
- Power Strap (optional): This broad strap at the top of the boot is for overall snugness. Leave it loose initially.
- Top Buckle: Start at the buckle closest to your shin. Snug it up firmly, but not so tight it cuts off circulation. You should be able to feel some heel hold with this buckle.
- Second Buckle: This buckle, usually located just below the top buckle, plays a crucial role in securing your heel. Buckle it snugly for a good, locked-in feel.
- Lower Buckles: Work your way down, tightening each buckle progressively less than the one above. You want a snug fit throughout the boot, but still allowing some flex for ankle movement.
- Power Strap (optional): Once all the buckles are secure, adjust the power strap to match the overall tightness of the top buckles. It should provide additional support without excessive pressure.
Key Points:
- Focus on Heel Fit: The second buckle and the lower part of the liner are most crucial for keeping your heel locked in place. A secure heel prevents unwanted movement and gives you better control over your skis.
- Snug but Not Suffocating: There should be a balance between a secure fit and allowing some blood flow. If your toes feel numb or tingly, loosen the buckles slightly.
- Flex Forward: Buckle your boots while standing with your knees slightly bent and shins flexed forward. This mimics the skiing position and ensures a good fit throughout the range of motion.
- Adjust Throughout the Day: Your feet might swell slightly as the day progresses. Loosen the buckles a bit on the lift to improve circulation and tighten them again before your next run.
Remember: The ideal buckle tightness can vary depending on your boot model, personal preference, and skiing style. Experiment to find what works best for you while prioritizing comfort and good control.
4. Start warm:
Cold boots can be stiff and uncomfortable. Try putting them near a heat source (not directly on it!) for a few minutes before putting them on.
Don’t leave your boots in the car overnight where they’ll get freezing.
There are two main approaches to heating ski boots, each with its own methods:
Using Built-in Heaters:
Some high-end ski boots come with built-in heating elements in the liners. These are powered by rechargeable batteries and often controlled by a Bluetooth app for adjusting heat settings.
- Follow the manufacturer’s instructions: Each brand might have slight variations in operation. The instructions will typically detail charging the battery, activating the heating elements, and adjusting the temperature settings.
- Don’t overheat: While tempting to crank up the heat on cold days, avoid excessively high temperatures that can damage the liners or even cause burns.
Using External Heaters:
For boots without built-in heaters, you can use aftermarket options:
- Boot dryers: These electric dryers are designed specifically for ski boots. Place the boots on the dryers after a day on the slopes to remove moisture and promote even drying. Some models offer a heating function for a gentle warm-up.
- Heated insoles: Battery-powered insoles with heating elements can be placed inside your boots. Follow the insole manufacturer’s instructions for charging and using them safely.
- Heat packs: Disposable chemical heat packs can be placed strategically inside the boot for a temporary warming solution. However, be mindful of their limited duration and potential for uneven heating.
General Tips for Heating Ski Boots Safely:
- Never apply heat directly to the boot shell. Excessive heat can damage the plastic.
- Avoid leaving boots on high heat for extended periods. This can dry out the liners and make them brittle.
- Ensure boots are completely dry before applying heat. Applying heat to wet boots can trap moisture and lead to mold growth.
- Inspect boots regularly for signs of wear and tear. Damaged heating elements or frayed wires pose a safety risk.
Remember, the goal is to achieve a comfortable warmth, not scorching heat. By following these tips, you can safely heat your ski boots and enjoy warm, toasty feet on the slopes.
On the slopes:
- Loosen up on the lift: Between runs, loosen the buckles slightly to improve circulation and prevent your feet from getting numb.
- Stay dry: Change wet socks throughout the day to prevent blisters and cold feet.
Other tips:
- Custom footbeds: These can provide additional support and improve fit.
- Heat molding: Some shops offer heat molding which can further customize the boot to your foot.
By following these tips, you can help ensure that your ski boots are comfortable all day long, allowing you to focus on enjoying your time on the slopes!


